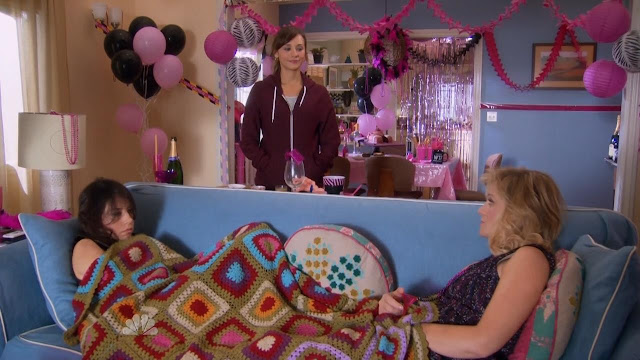
If you are a fan of the show Parks and Recreation and appreciate a cute a crochet you have probably noticed the adorable granny square afghan on the back of Ann's couch.
If you look closely you can see that this is not a classic granny square. The center starts with a circle and progresses out into a square. Also, the holes are really small.
Just a warning my afghan is not yet completed but a work in progress. I was just too excited to wait so I figured I would share the pattern now! And of course, this is not exact but I think it is pretty darn close!
Because I haven't completed this project I am not sure how much yarn will be needed for the entire afghan, but I used Red Heart Super Saver yarn in the following colors:
Tea Leaf
Pretty 'n Pink
Cherry Red
Turquoise
Pale Yellow
Pumpkin
Amethyst
Crochet hook: size I (5.5 mm)
( I doubled up on the yarn to make it thicker, crocheting 2 strands of yarn together throughout the whole pattern)
I corrected the pattern and added some more detailed pictures of the process!
Pattern:
Forming the inner circle:
Round 1: 6 SC in magic ring, slip stitch in first SC to join (6 stitches)
Round 2: 2 DC in each SC, slip stitch in first DC to join (12 stitches)
Round 3: 2 DC in each DC, slip stitch in first DC to join (24 stitches)
Your circle should look like this:
To add a new color here, cut yarn and ch1 with new color before beginning the next row
Shaping the corners:
Round 4: [2 DC in first DC, 1 DC in each DC for next 5 stitches] repeat to end of round, which will be 3 more times; Also, don't slip the first stitch at the end of this round. (28 stitches)
This is what round 4 should look like after the first sequence
Round 4 completed should look like this. The corners will begin to form where each of the 2 DC in the same stitch were created. To make it easier, I numbered each corner.
Round 5 begins in corner 1. And...the granny square part starts!!!
Round 5: [2 DC in same DC, ch 2, 2 DC in same DC, ch 1 (Skip 1 stitch), 2 DC in same DC, ch 1 (Skip 1 stitch), 2 DC in same DC, ch 1 (Skip 1 stitch)] repeat 3 more times. Then, slip stitch in first DC and second DC of round 5 to join. Cut and secure yarn in ch 2 space of corner 1.
This is round 5 after 1 sequence.
Round 5 (almost completed) completed should now look like this.
Time to change color! And now, its basic granny squaring from here...
Round 6:
Start in Ch 2 space of corner 1
Form corner: 2 DC in ch 2 space, ch 2, 2 DC in ch 2 space, then, [ch 1, 2 DC in ch 1 space] repeat this two more times, ch 1. Repeat this entire step 3 more times. At the end of last repeat slip the first 2 DCs and ch 2 space of corner 1.
This is what round 6 should begin to look like. Both corners 1 and 2 are formed
Round 7: Keep working in the same fashion as round 6. At the end of this round, cut yarn and secure in ch 2 space of corner 1 of round 7. Change color!
Rounds 8 and 9: With the new color attached work the square just like the previous round
Beginning of round 8
End of round 9
Weave in all yarn ends (I hate this part!)
And again, you can use this great color schematic to figure out color combos and when to change colors
My squares measure to about 9" by 9"
I am new to crocheting so if you are confused or find anything unclear please don't hesitate to ask! Enjoy and stay tuned for the completed project!
I linked up to these wonderful parties!
My Merry Messy Life's Hookin Up on Hump Day
Crochet Happy's Crochet Awesomeness Link Party
I linked up to these wonderful parties!
My Merry Messy Life's Hookin Up on Hump Day
Crochet Happy's Crochet Awesomeness Link Party


.JPG)
.JPG)
.JPG)
.JPG)
.JPG)
.JPG)
